Photo: http://long-live-the-kings.blogspot.fr/
Don’t try this at home.

Venice Vintage Motorcycle Rally 2012
Just some quick snapshot photos of the day.
It started with a massive group photo of 100’s of bikes at 9AM.
Then a ride up PCH.
Then a party and judging contest on Venice Blvd.
I was there for the beginning and to see some of the winning bikes. Overall it was a good day. Lots of amazing bikes. Hot weather. Cool crowd and some really cool vendors. I’m already looking forward to next year!
Here is where it started… In line with a bunch of other bikes.

For some reason, they broke they broke us into two groups as traffic passed between on Pacific. I’m curious to see how this massive group photo turns out.

My bike in a sea of iron and sweat.

A nice R69S reflected in the tank of my bike.

The winning cafe bike (i think). 
A 1939 R35 BMW that won ‘best in show’. Well deserved. Congrats to whoever owns it.
Built a battery bracket
Got the Shorai battery and luckily it fits under the tail section as I had hoped. It only weights about 3 lbs so it shouldn’t be a weight issue. It will just be a matter of running the wires in discreet places.
I bought some aluminum to make a cage and bracket for it.

I cut the two ‘L’ brackets to create bumpers from preventing the battery from moving forward or backward.Then started bending the aluminum strip to make a srtap like bracket to hold the battery from moving left/right or uo/down.

I marked the footing and drilled some holes. I purposely offset the bracket to not interfere with the outlet on the battery for the Shorai battery tender.

Shorai Battery Arrived
In order to size everything prior to paint, i had to order the battery. I want to build a bracket and make sure everything fits under the tail section.
We got a Shorai Battery and holy smokes, it weighs NOTHING. Well, actually, about 3 pounds. But still…
It is a bit thicker then i had anticipated but so far it doesn’t seem like it will be a problem.
What I am most impressed by is that they sent the battery packed in closed cell foam pieces.
I’m sure this was done for protection in shipping but also for those using this battery and who need to fill all the empty space left from going to a massive, heavy battery to a lightweight and smaller Shorai Lithium Battery.
It is starting to look like a bike again
I’ve been putting time in on the bike but not keeping up on the blog. Work has been nuts lately and I need the garage time much more then additional screen time.
The bike is starting to look like a motorcycle again. I have some old wheels as ‘stand ins’ until i get rubber on the new rims.
The rest of the bike is ‘finger tight’ at the moment. I’ll start tightening everything down once i have more of the actual parts ready, and the bodywork is done.
I customized a BoxerMetal fender elimination plate to fit a SWB bike. It took about 22 walks to the bike, test fit, trim, and repeat until it fit properly. It also required some additional bending.
This plate will also hold the battery under the seat’s tail section.
Front brake mounted to the forks. Nice and polished brake arms:

Starting to look like a Motorcycle again!!!

Starting to figure out the bodywork. I love how my 2002 is reflected in the toaster panel.

I think we are going to go with a 3inch racing stripe down the middle:

Emblem is going to look nice… all i have lying around is a tank emblem that fits the tail emboss.

I can’t wait to ride this thing…

I trimmed the front fender a bit and moved the rear fender bracket up the fender a bit. I was thinking of taking a bit more off the front of the fender but can’t bring myself to do it yet. I’m not sure it is necessary. 
Brake Shoes
When Eurotech Motorsports closed down, they had a Siebenrock R75 power kit on sale but it only had one Stainless Steel pushrod tube. While I was placing an order for the remaining pushrod tubes, I figured that I should get some of the brake shoes that Siebenrock sells.
The shoes they sell are Lucas and I am excited to try them out. They appear softer than the hard BMW shoes.
Hard to tell the future but I think we’ll be taking better braking and wearing down brake shoes over poor braking and shoes that never wear down.
Plus, the BMW kit is about twice as expensive as the aftermarket kits out there.
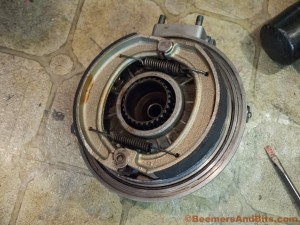
Here is the back of the front brake hub. Remember to lubricate all the pivot pins with grease:

Bought the gal a new pair of shoes:

Shoes installed. Take note of the different springs. It is important that the thicker spring goes in the proper place:

I may end up adjusting the arms once the bike is built and the cable is run but for now, i am setting them up in the standard position. The center of the holes should measure 7 inches.

Final Drive:
There is a washer that goes between the pivot pin and the final drive. And remember to lube the pivot pin.

The rear brake shoes were a bit harder to install due to the spring tension. But i find it easiest to install one side, hook up the springs and then bend or snap the other side into place. Make sure everything seats properly.


