BMW R90/6 Rear wheel bearing install

Back to Beemers…
I’m working on a project bike for a friend and had the items powder coated satin black. I’m very excited to see how this bike will turn out.
And yes, I have a very messy garage/workbench at the moment.
I removed the wheel bearings and the races with lots of heat, and the help of a press.
Then went to the powder coat shop and gave them the masking instructions.

Here are some photos of the install.
Not pictured is the process of checking and testing the bearings in the race to make sure they spin smoothly.
If not, clean them, re-test, and clean them again, etc…
Then grease ’em good!
Also not pictured is the process of cleaning the inside of the hub REALLY well. Especially since they were sand blasted.
And.. then there is the process of pre-loading the bearings, freezing them for a day, heating the hub and then ‘plop’, you are done.

Bearings from when I pulled them from the hub.
WheelBearing1

Clean Hub:
WheelBearing2

Preloaded bearing stack. I have a piece of steel pipe that I put on the other side of the stack with the axle to help with the preload.
WheelBearing3

A nice propping set up for when it is all heated. These are damaged cork Yoga blocks that a yoga company couldn’t sell. I happily found a home for them in my garage and they come in handy!
WheelBearing4

Frozen bearing stack and axle dropped into that toasty hot hub.
WheelBearing5

Check out Oshmo.com

Just an update… I have 3 bikes in the works but they have been taking longer then expected.  I’m trying to customize many features vs buying the available parts out there.
And, I’ve been busy over at Oshmo.com helping to develop some Airhead aftermarket parts that look good, and function, for customizing these old BMW’s.

Recent additions are rear sets, and top clamps…  more ideas to come!!

Black Rear Sets for 1970's BMW motorcycles

Black Rear Sets for 1970’s BMW motorcycles


Old Steering Bearings

I am glad I am doing a complete rebuild of this bike. The steering was a bit stiff and not smooth. Once I got the neck out of the frame, I realized why.
Rusted Steering bearings.
Since the frame is going to be powder coated, the races have to come out anyway. I could see somebody buying the bike and not getting this deep into the restoration and it would be dangerous to ride with bearings like that.
These went straight to the trash.

steeringBearing03c

Willow Springs Vintage Races 2013

A day at the races. April 27th, 2013

Learning the rules of the track:
InstragramRaceRules

First race:
Willow2013_MG_3535

Willow2013_MG_3532

A friend and fellow BMW /5 rider Jerome Brown on a Honda:
JeromeBrown_MG_3549

Stacy from the East Side Moto Babes club:
Willow2013_MG_3568

The BMW race representation:
Willow2013_MG_3762

Willow2013_MG_3751

Willow2013_MG_3740

Willow2013_MG_3730

Side Car Races. I wish i got up on the hill to get some photos of them leaning out the sidecars on the turns. Their heads were about 4 inches from the pavement leaning out the side of the sidecar. Crazy. And afterwards I saw that many of the sidecar passengers were women. Rock on ladies!
Willow2013_MG_3603

Willow2013_MG_3602

Willow2013_MG_3585

Anatomy of a BMW sidecar:
Willow2013_1040247

I couldn’t agree more:
Willow2013_1040257

Willow2013_MG_3667

The people watching was as good as the race watching:

Willow2013_1040241

Willow2013_1040239

My buddy hanging out at turn #4:
_MG_3679

This vintage piece of art was only $250,000:
Willow2013_1040243

Swap meet and display bikes:
Willow2013_1040209

_1040171

Willow2013_1040202

Willow2013_1040225

Willow2013_1040231

I’m a sucker for beautiful blue bikes:
Willow2013_1040260

This guy has his German priorities straight:
Willow2013_1040167

Nice details on this bike:
_1040218

Willow2013_1040217

Willow2013_MG_3702

Willow2013_MG_3722

Willow2013_MG_3649

Willow2013_MG_3648

Finish Line:
Willow2013_MG_3571

Prepping for Race Tech Gold Valve Emulators

I’ve heard great things about these Race Tech Gold Valve Fork Emulators. What I have had trouble with, is getting the proper instal instructions and modifications needed for a 70’s BMW motorcycle.
Hopefully this will help others who plan to do the modification.
For information on how the emulators work, please read through this link.
Dampening Rod Forks and Emulators
For instructions and diagrams of a BMW /5 fork leg, check out an old Beemers and Bits link:
http://beemersandbits.com/2011/12/lower-fork-leg-anatomy-of-a-5-bmw-motorcycle/

Unfortunately, I’m not going to test the results anytime soon. The bike is undergoing an entire rebuild and I’m at the point where i am trying to make a rolling chassis. So as i wait for some fork seals from BMW, I am starting to prep all the parts for reassembly.

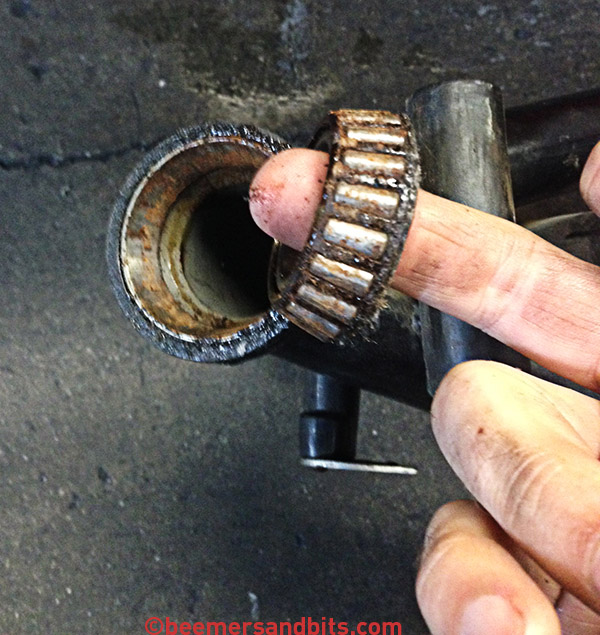
With the dampening rods removed from the forks, they need to be disassembled and modified.

Here is the dampening rod with the bottom nut removed and the 1/4″ drill bit to be used later.
Note that the spring and check ball get discarded when doing this modification.

Here is the upper piston removal:

It really helps if you have a drill press for something like this.
All the holes at the bottom of the rod need to be widened to 1/4″ inch.

Here are both dampener rods and an old rod. You can see the difference in hole size to allow for more oil flow. Also note my gun cleaner and airbrush nozzle cleaners in the top of the photo. The inside of the rods and holes needs to be cleaned thoroughly after you drill them. Any small sharp bits of metal will chew up your fork seals, the inner fork tube walls, and all the other moving parts.

With the piston removed, a hole needs to be added to the top of the piston to allow more oil flow to the emulator. A lathe would probably be the best tool for the job but i had to improvise with my drill press. I found it easiest to drill from the inside. And i held the piston in place with a 13mm wrench. (My method may not be the safest or smartest but it worked for me. Be Safe!).
A Before and After of the piston top.
I have read some suggestions that say to cut the top of the piston off entirely, or to cut it where the holes are. I want to be able to tighten the piston on the dampener so I drilled a hole into it. This isn’t my photo but it give you an idea of another option:

In the end, i wound up shaving down the hex head of the piston a bit. i want to make sure that the part of the emulator that sticks down in the PVC spacer does not hit the piston. I also widened the piston holes to allow for more oil flow.

Then it was off to the local hardware store to buy some 3/4″ PVC to use as a spacer between the piston and the emulator. $.64 got me a foot of pipe. More then i’ll need.
It is suggested that you cut a length between 35-40mm. Since I didn’t cut the piston, i figured 40mm would be a safe size to keep distance between the piston and the emulator. After i squared up the ends, it was more like 39mm.

If you are using Race Tech springs as well, it is suggested that you add 15mm PVC spacers at the top of the springs. The Race Tech springs are slightly shorter then stock springs.
Here is a 15mm aluminum spacer next to my PVC spacers. The aluminum spacer was on one of the bikes when I disassembled it.

It is also recommended that you use use 15wt Fork Oil set to 130mm Oil Level (from top of fork tube to oil with the fork tube at bottom of stroke & the fork spring removed.)

I’ll be sure to post back once I feel the difference between my stock /5 forks and the forks on the rebuild bike.

Steering Race and Bearing Install

How to install races and steering bearings.

First, freeze your races for a day. Hopefully this will allow the metal to shrink for an easier install. Does anybody else shop at Trader Joes?
While they are cold, quickly set them into the frame and use a drift to hammer them in EVENLY.

It helps if you have an old race handy to drive the race into the frame until it bottoms out. If you don’t drive it in all the way, it will eventually settle while you are riding and your steering will require constant adjustments. If you are using an old race, try to cut a slice in the race or shave it down a bit so it doesn’t get stuck in the frame.

Here is a photo of the bottom race that is receded into the frame (with some grease on it).

Now it is time to prep the triple tree. /5’s have a small dust protector cup that sits at the base of the yolk under the bearings.
When it comes time to install the bearing, you will notice that it will not fit onto the stem.
You need to arm yourself with heat. I ended up only using the heat gun but still managed to set off a fire alarm (my wife wasn’t happy). You only heat the lower bearing by itself. That’s it. I had a scrap piece of plywood that i used as a surface to heat the bearing on.
Be CAREFUL when installing the bearing. If it is hot enough, it should drop right on. Make sure it is seated properly (Flat on the base) and it will quickly cool into position.

I noticed that the upper tightening clamp was NASTY. So i did a quick cleaning and polish… Only to realize from another BMW guru (Duane) that they were only used for a year or two on /5 and then quickly replaced by something better.

Here are all the parts. Grease up the bearings REALLY good. Grease up the races too. Plan on getting messy and working the grease into the bearings as much as you can. Then add a wee bit more.

I don’t have photos of the upper bearing install.
When you install the lower triple tree and steering stem into the bottom of the neck, you hold it into the neck as tight as possible. You don’t need to heat the upper bearing.
You set the bearing on the neck,
Then install the chrome dust cover,
Then let the tightening ring do all the work and ‘seat’ the upper bearing into the upper race.
The manual says to tighten it all the way until there is no free play anymore, and then slightly back off.

Here is the /5 Tightening nut. BAD:
Here is the /6 tightening nut. BETTER:

Then you can install the upper triple tree and steering neck nut. (Note: a San Jose Triple Tree is in the photo. Toaster Tan is another aftermarket option for triple trees.)

Pulling steering races from BMW motorcycle frame

I finally broke down and got a race puller from Cycle Works. Here is a step by step on how to pull the steering bearing races from the neck of the frame.


Photo courtesy of Cycle Works


Note the way the split washer sits on the bolt.


The washer needs to go behind the race. You may need to tap it into the neck.


I had to use a few long sockets and extenders to reach the 10mm head of the bolt through the other side of the neck.


When you tighten the nut onto the bolt, it expands the split washer to fit tightly behind the race. This will help pull the race out.


Insert the slice of tube(collar) and attach the nut with the large washer as shown. Make sure the piece of tubing sits centered on the frame aligned so the race can slide out into the tube.


27mm socket to tighten the nut. Breaker bar with socket extension through the neck attached to the 10mm nut on the bolt.


After some torque and cranking, you can feel the race start to pull out into the collar. Eventually, everything will pop out as shown. Save an old race. Next time you use the tool, you can keep an old race in the collar to prevent the collar from warping, and to help guide the next race out.