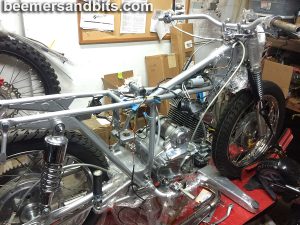
After 5 years or so… this one finally made it off the shelves and back into action.


After 5 years or so… this one finally made it off the shelves and back into action.

1967 Bridgestone 175 Hurricane Scrambler
I’m honored to have won second place at the Southern California 2 Stroke Festival

And, Motorcycle Classics ran a feature on my restoration story!

Motorcycle Classics September/October 2018

Motorcycle Classics September/October 2018

Motorcycle Classics September/October 2018
Back from powder coat.
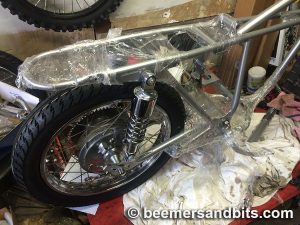
Back from powder coat.

Clean carbs

I sourced this engine build to a guy who builds Yamaha RD’s and such. Fingers crossed it works.

Painter went all out… all i needed was the rear dome painted. I’m not complaining. It looks amazing. The tank looks killer. Photos of that to come
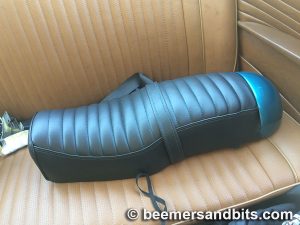
Upholstery complete.
“Ran When Parked”
“Just needs gas and a tune up”
Ahhh… the phrases I am seeing in the ads when people are selling a complete hunk of crap. I bought the last restoration candidate knowing I was going to do a full rebuild but the owner’s ad and conversations were trying to sell me on the fact that the bike could run with an afternoon’s worth of work.
WRONG. I found all sorts of surprises when rebuilding that engine (and elsewhere throughout the bike).
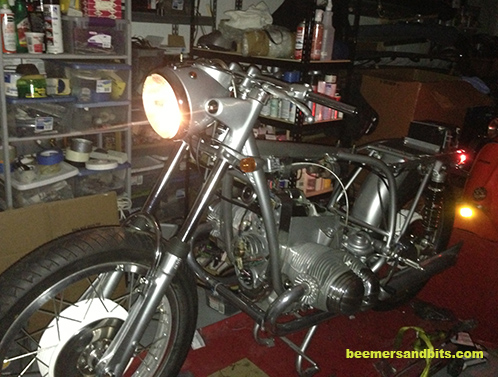
The bike was an R75/5.
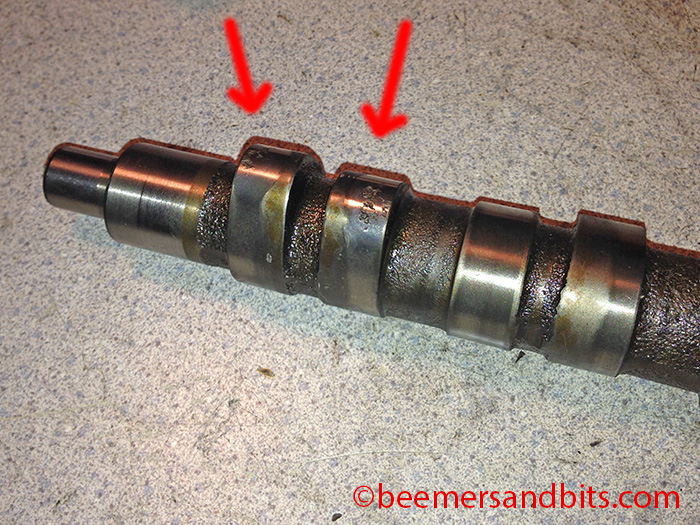
One issue was a deep in the engine when taking out the cam shaft. The lobes were severely pitted rendering the cam useless. The bike still would run but doing a complete rebuild was necessary to make this bike ‘right’. I have a stash of spare parts and happened to have an extra cam shaft lying around. Here are some photos of the bad cam. If you ever get this deep into the engine block (or at least have the cylinders off), take a look at the cam lobes. If they are pitted, the lifters probably need replacing too.

Here is a simple oil filter change fault.
If you don’t know the history of the bike, it is good to do a complete oil change as soon as possible. When replacing the oil filter, make sure that the entire old oil filter comes out.
In this case, the gasket and end of an old oil filter were jammed into the rear of the oil filter galley. I’m assuming that an old filter got removed, those parts were left inside, and new filters were installed on top of them, thus jamming them in there even further. It took me nearly 20 minutes to devise chopstick like tools, with hooks on the end, strong enough to pull this stuff out.


Just another reason that the used motorcycle market is overpriced on 30-40 year old machines. Unless you know the bike has ZERO issues like this deep down inside, the cost of repairing these motorcycles is much too high compared to the asking prices these days ($4000 for an old Honda? why?).
In addition to the engine needing a rebuild, the steering bearings were rusted (which is dangerous), the splines and driving dog were almost gone on the final drive and rear wheel, and LOTS of other repairs were necessary. Again, I planned on doing all the repairs anyway but beware of the “Just needs a battery and a tune up” ads.
Finally. After about 20 years since this bike was last titled. And 2 years of restoration time. It is showing signs of life.
More photos and updates have been added to the post: /5 Speedometer Wiring
These are the 64/32/9 and 64/32/10 BING carburetors. They were standard issue on the R75/5 BMWs back in the early 70’s. From what Siebenrock says, they will work just fine with their power/performance upgrade piston/cylinder kit. They may need different jetting but I’ll cross that bridge when I mount them to an assembled engine.
I finally got around to looking into them. Holy crap, they are used and abused. I have two sets, one from the parts bike and another from our ‘main’ bike.
One set has been modified by a previous owner who added vacuum ports on them. The ports look bad, and who knows if they are completely sealed so i’m going to shy away from using that set of carbs. Too risky.

The other set is nasty but can be rebuilt. The diaphragms are OK but everything else leads me to believe they have never been rebuilt before. The only drawback to using these carbs is that the BING nameplates are trashed and replacing them is a tricky job that requires precisely drilling out each metal nail. It may require many hours and machine work that I’m uncertain about. I’m thinking that I will polish the crap out of those plates instead.
Here is the carb, dirty and ready for a new life:

Here goes:

Choke removed, needles coming out:


Everything apart (an unofficial diagram):

The second carb had a slight issue… One of the butterfly screw heads turned to putty and stripped when I tried to remove it. I had to drill it out, and bastardize some parts from the second set of carbs to replace the pivot arm that the butterfly attaches to.

I was lucky enough to receive an Ultrasonic cleaner as a gift earlier in the year. I LOVE the idea of NOT using a highly chemical, messy, toxic carb cleaner kit. So I poured a bit of simple green in the tank, a small dab of laundry soap and some hot water.


After about 20 minutes of vibrations, the carbs came out nice and clean.
Before:

After:

Next steps:
Time to buy the complete BING rebuild kit for $210. And maybe blast these carbs for an even cleaner surface.