It is starting to look like a bike again

I’ve been putting time in on the bike but not keeping up on the blog. Work has been nuts lately and I need the garage time much more then additional screen time.

The bike is starting to look like a motorcycle again. I have some old wheels as ‘stand ins’ until i get rubber on the new rims.
The rest of the bike is ‘finger tight’ at the moment. I’ll start tightening everything down once i have more of the actual parts ready, and the bodywork is done.

I customized a BoxerMetal fender elimination plate to fit a SWB bike. It took about 22 walks to the bike, test fit, trim, and repeat until it fit properly. It also required some additional bending.
This plate will also hold the battery under the seat’s tail section.

Front brake mounted to the forks. Nice and polished brake arms:

Starting to look like a Motorcycle again!!!

Starting to figure out the bodywork. I love how my 2002 is reflected in the toaster panel.

I think we are going to go with a 3inch racing stripe down the middle:

3 inches on the tail too:

Emblem is going to look nice… all i have lying around is a tank emblem that fits the tail emboss.

I can’t wait to ride this thing…

I trimmed the front fender a bit and moved the rear fender bracket up the fender a bit. I was thinking of taking a bit more off the front of the fender but can’t bring myself to do it yet. I’m not sure it is necessary.

Brake Shoes

When Eurotech Motorsports closed down, they had a Siebenrock R75 power kit on sale but it only had one Stainless Steel pushrod tube. While I was placing an order for the remaining pushrod tubes, I figured that I should get some of the brake shoes that Siebenrock sells.
The shoes they sell are Lucas and I am excited to try them out. They appear softer than the hard BMW shoes.
Hard to tell the future but I think we’ll be taking better braking and wearing down brake shoes over poor braking and shoes that never wear down.
Plus, the BMW kit is about twice as expensive as the aftermarket kits out there.

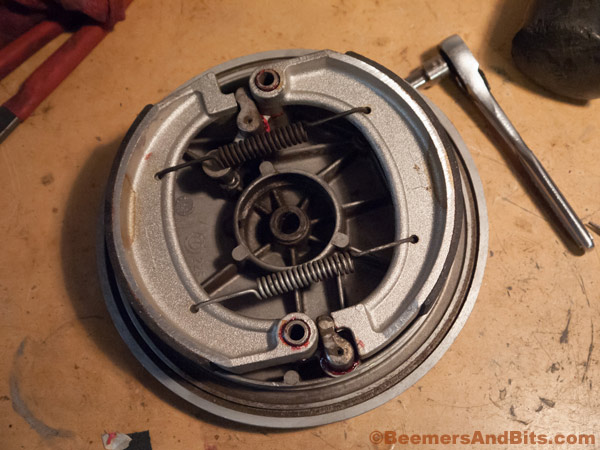
Here is the back of the front brake hub. Remember to lubricate all the pivot pins with grease:

Pivot parts installed:

Bought the gal a new pair of shoes:

Shoes installed. Take note of the different springs. It is important that the thicker spring goes in the proper place:

Don’t forget the snap ring:

I may end up adjusting the arms once the bike is built and the cable is run but for now, i am setting them up in the standard position. The center of the holes should measure 7 inches.

Final Drive:

There is a washer that goes between the pivot pin and the final drive. And remember to lube the pivot pin.

The rear brake shoes were a bit harder to install due to the spring tension. But i find it easiest to install one side, hook up the springs and then bend or snap the other side into place. Make sure everything seats properly.


Swing arm race and bearing install

Installation of the swing arm bearings.

Here is the order of the parts. The first part is a cup that only goes on the side of the swingarm opposite of the drive shaft. All it does is prevents grease from traveling into the crossmember of the swingarm. The other side does not require one.

First install that cup/plate into the swingarm and make sure it sits flush on the small lip.

I stuck the races in the freezer with hopes they would shrink enough to make the instal a bit easier.
The races can be driven in by hammering them in with a 30mm socket or if you have the Cycleworks race puller, the aluminum plate is also meant to be used as a driver.

Here is a 30mm socket (i know, the socket is upside down. I threw it in there for the photo):

Here is the Cycleworks plate being used as a drift:


Race installed:

Greased up bearing (be sure to pack it well with grease):

Then goes the collar with the flat side down, against the bearing:

Then goes the dust seal:

I prefer to install the collar through the rear of the dust seal, and then insert the dust seal into the swinarm:

One side done:

The process is exactly the same for the other side except for the grease protection cup.

New U Joint for the driveshaft

I finally got the swing arm back from the local mechanic.
I took the old driveshaft to him to install it in the swingarm and he noticed that there was a bit of slop in the U joints. So we had them replaced. These aren’t BMW parts but you can find people making them. I’ve since seen some on E-bay with grease fittings. My mechanic has been using these for quite some time now so I trusted his knowledge on this.

BMW /5 Wheel Offset information

I took my hubs and rims to get laced last weekend. I brought an extra set of assembled wheels for reference and the guy doing the lacing said BMW’s didn’t have an offset (meaning they were “0” or centered). So i took the extra set home thinking he was the expert. However, it is a shop that mostly specializes in Japanese bikes.
I remembered reading something about there being an offset many years ago and I looked into it. It turns out that the /5 motorcycles do have an offset (because of the drum brakes and hub).
Some say that wheels with disk brakes do not have an offset but not according to the spec sheet.
I called the the person doing the lacing and he was very nice to talk to.
His name is AL and the shop is Johnson and Wood in North Hollywood.

Here is a piece of advice written by the BMW motorcycle guru Duane Ausherman:

Before you cut the old spokes, install the wheel, with or without a tire. Measure to each side of the swing arm. This will tell you just how centered it is. If you need to move it over a bit, calculate it.

Then lay the wheel down on a flat surface. If it is a drum brake, it is very easy. Have the drum side down. Now find 3 nuts that will just fit under the rim. The thickness of the nuts gives you the current off-set. Now calculate in any correction needed for the wider tire.

Now find 3 nuts of the off-set you desire. Hold the rim off the flat surface to give you the off-set. Lace the spokes in by hand and a bit at a time bring the nipples up to snug. The rim is now laced to the correct off-set that you desire. Put it in your tuning jig and finish up. As long as you do equal tightening to each nipple, the off-set won’t change.

I have done many dozens this way and it is much faster than using the BMW off-set tool.

Attached is the BMW spec sheet from 40 years ago. Hopefully this will serve as a guide for others out there who are lacing rims.

Fork seal installation

A quick ‘How To’ install the fork seals.

You can pop the old seals out with a screwdriver or something else to pry them out. Just be cautious you don’t score or damage the inside of the fork leg/lower.

First make sure the fork lowers are clean.

Then sit the fork seals flat onto the top of the fork tube. It helps if you have a large socket, or something similar to help drive them in. I happen to have a 36mm socket that fits the diameter of the seal pretty good. It might be better if it was 34 or 35mm but it still did the trick.
I placed the socket over the seal, and tapped it in with a hammer. Here is a photo of the job with the seals about half way in:

Here are the two fork lowers with the seals fully inserted:

Rotor Removal

Once again, I had to return to the old donor engine block for some spare parts. The rotor on the engine to be rebuilt was a rusted mess. The rotor on the donor engine looks brand new. I will test it with an voltmeter to be safe, but being that it is so clean, i am not too worried.

To remove a Rotor, you need to have the rotor puller bolt.
BMW sells it, Huckey BMW sells one, Motoelekt.com sells one… it is between $5-$10. Or, you can search online on how to make your own. (click the photo to enlarge it)

Once you removed the alternator,
To remove the rotor, all you will need is a 6mm hex bit and a 13mm socket.

Loosen the rotor bolt with the 6mm hex bit and remove it completely. You may need to block the engine from rotating.

Then screw in the puller bolt.

Begin slowly tightening it with the socket until the rotor pops off the crank. That’s it. Done.