Steering Lock Install

This job should have taken me 3 minutes. Instead, it took nearly an hour and a few new curse words were invented.

You can remove the lock easily if you have the key.
Simply remove the chrome cover, and then insert the key, turn it counter clockwise until it stops (around 10 o’clock) and then wiggle and pull the key/assembly out.
If you don’t have the key and you removed the steering assembly, You can use a drift on the front of the lock, and punch the entire lock assembly through the neck. It will ruin the lock.
If you don’t have the key and you didn’t remove the steering assembly, it can be drilled out if your run a small drill bit between the brass and silver part of the lock…at the 2 o’clock position.

For more on Lock Removal, check out Duane Ausherman’s site which is chock full of other BMW tips too:
http://w6rec.com/bmw-motorcycle-fork-and-tank-lock-neiman-keys/

With a new lock, chrome cover and pivot pin from BMW, i thought the installation job would be a simple task.
It turns out that these new locks and chrome covers are different then the originals and require some modification.

Here is the new assembly from BMW:

With the key inserted, you turn the lock to line up the small flathead screw-pin with the upper shark fin and slide it into the frame.
Once it is inserted, you can turn your steering assembly/handlebars to the right.
Turn the key and press the lock into the frame. The lock’s end should insert into a hole in the neck of the tripple tree. It should go deep enough into the frame/neck that when you twist the key back, it will catch in a receded position.
Here is the hole I am referring to:

This is what a locked steering lock looks like. Notice how it is receded into the frame:

After scratching my head and swearing a few times, no matter how hard i pushed that lock into the frame/neck, it would not reach the second “catch point” to lock.
I tested the lock to make sure it fit in my spare triple tree and it did.
I then wondered if the notch wasn’t deep enough so i ground it down on both sides a bit.
It still didn’t work properly. I cleaned out the inside and then started doing some tests with grease on the lock. After i made some failed attempts with a greased up lock, i would remove it and see where grease was hitting and not hitting the innards of the frame. It seemed that i had to grind the notch even further.

I did a test fit and Bingo! It worked!
Don’t forget the small spring that goes around the end of the lock!
That spring is what provides the resistance to do the locking and unlocking.
It is BMW part number 32 32 9 016 104

I then lubed up the spring and lock and inserted it into the frame.

Then it came time to attach the chrome cover and pivot pin. I put it all together and then realized that the cover doesn’t slide as nice as the old one. I took it apart and realized that the old cover has a notch on the back that leaves space for a small pin that sticks out of the frame and acts as a ‘catch’ point to either open or close the cover.

Son of a B$#@@. Why can’t this job be easy?
I pulled the cover off the bike and saw that the protruding pin from the frame left some convenient scrapes on the back of the cover.
I put the plate under my drill press and shaved down a small pocket where the pin makes contact with the cover. Not the cleanest job but it works and nobody will ever see the rear of that cover.
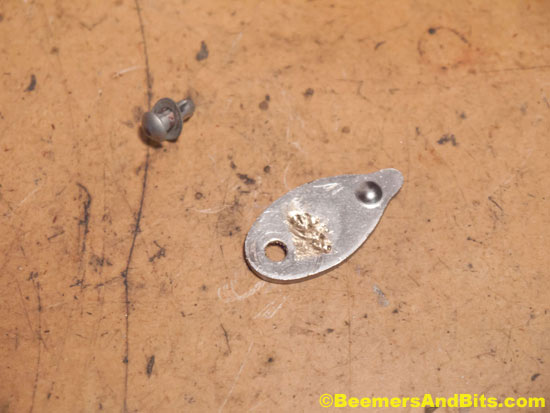
Here is a second attempt at the rear from another bike restoration. I routed it out with a tiny routing bit:
IMG_4193

Phew. Finally done.

Prepping for Race Tech Gold Valve Emulators

I’ve heard great things about these Race Tech Gold Valve Fork Emulators. What I have had trouble with, is getting the proper instal instructions and modifications needed for a 70’s BMW motorcycle.
Hopefully this will help others who plan to do the modification.
For information on how the emulators work, please read through this link.
Dampening Rod Forks and Emulators
For instructions and diagrams of a BMW /5 fork leg, check out an old Beemers and Bits link:
http://beemersandbits.com/2011/12/lower-fork-leg-anatomy-of-a-5-bmw-motorcycle/

Unfortunately, I’m not going to test the results anytime soon. The bike is undergoing an entire rebuild and I’m at the point where i am trying to make a rolling chassis. So as i wait for some fork seals from BMW, I am starting to prep all the parts for reassembly.

With the dampening rods removed from the forks, they need to be disassembled and modified.

Here is the dampening rod with the bottom nut removed and the 1/4″ drill bit to be used later.
Note that the spring and check ball get discarded when doing this modification.

Here is the upper piston removal:

It really helps if you have a drill press for something like this.
All the holes at the bottom of the rod need to be widened to 1/4″ inch.

Here are both dampener rods and an old rod. You can see the difference in hole size to allow for more oil flow. Also note my gun cleaner and airbrush nozzle cleaners in the top of the photo. The inside of the rods and holes needs to be cleaned thoroughly after you drill them. Any small sharp bits of metal will chew up your fork seals, the inner fork tube walls, and all the other moving parts.

With the piston removed, a hole needs to be added to the top of the piston to allow more oil flow to the emulator. A lathe would probably be the best tool for the job but i had to improvise with my drill press. I found it easiest to drill from the inside. And i held the piston in place with a 13mm wrench. (My method may not be the safest or smartest but it worked for me. Be Safe!).
A Before and After of the piston top.
I have read some suggestions that say to cut the top of the piston off entirely, or to cut it where the holes are. I want to be able to tighten the piston on the dampener so I drilled a hole into it. This isn’t my photo but it give you an idea of another option:

In the end, i wound up shaving down the hex head of the piston a bit. i want to make sure that the part of the emulator that sticks down in the PVC spacer does not hit the piston. I also widened the piston holes to allow for more oil flow.

Then it was off to the local hardware store to buy some 3/4″ PVC to use as a spacer between the piston and the emulator. $.64 got me a foot of pipe. More then i’ll need.
It is suggested that you cut a length between 35-40mm. Since I didn’t cut the piston, i figured 40mm would be a safe size to keep distance between the piston and the emulator. After i squared up the ends, it was more like 39mm.

If you are using Race Tech springs as well, it is suggested that you add 15mm PVC spacers at the top of the springs. The Race Tech springs are slightly shorter then stock springs.
Here is a 15mm aluminum spacer next to my PVC spacers. The aluminum spacer was on one of the bikes when I disassembled it.

It is also recommended that you use use 15wt Fork Oil set to 130mm Oil Level (from top of fork tube to oil with the fork tube at bottom of stroke & the fork spring removed.)

I’ll be sure to post back once I feel the difference between my stock /5 forks and the forks on the rebuild bike.

Steering Race and Bearing Install

How to install races and steering bearings.

First, freeze your races for a day. Hopefully this will allow the metal to shrink for an easier install. Does anybody else shop at Trader Joes?
While they are cold, quickly set them into the frame and use a drift to hammer them in EVENLY.

It helps if you have an old race handy to drive the race into the frame until it bottoms out. If you don’t drive it in all the way, it will eventually settle while you are riding and your steering will require constant adjustments. If you are using an old race, try to cut a slice in the race or shave it down a bit so it doesn’t get stuck in the frame.

Here is a photo of the bottom race that is receded into the frame (with some grease on it).

Now it is time to prep the triple tree. /5’s have a small dust protector cup that sits at the base of the yolk under the bearings.
When it comes time to install the bearing, you will notice that it will not fit onto the stem.
You need to arm yourself with heat. I ended up only using the heat gun but still managed to set off a fire alarm (my wife wasn’t happy). You only heat the lower bearing by itself. That’s it. I had a scrap piece of plywood that i used as a surface to heat the bearing on.
Be CAREFUL when installing the bearing. If it is hot enough, it should drop right on. Make sure it is seated properly (Flat on the base) and it will quickly cool into position.

I noticed that the upper tightening clamp was NASTY. So i did a quick cleaning and polish… Only to realize from another BMW guru (Duane) that they were only used for a year or two on /5 and then quickly replaced by something better.

Here are all the parts. Grease up the bearings REALLY good. Grease up the races too. Plan on getting messy and working the grease into the bearings as much as you can. Then add a wee bit more.

I don’t have photos of the upper bearing install.
When you install the lower triple tree and steering stem into the bottom of the neck, you hold it into the neck as tight as possible. You don’t need to heat the upper bearing.
You set the bearing on the neck,
Then install the chrome dust cover,
Then let the tightening ring do all the work and ‘seat’ the upper bearing into the upper race.
The manual says to tighten it all the way until there is no free play anymore, and then slightly back off.

Here is the /5 Tightening nut. BAD:
Here is the /6 tightening nut. BETTER:

Then you can install the upper triple tree and steering neck nut. (Note: a San Jose Triple Tree is in the photo. Toaster Tan is another aftermarket option for triple trees.)

Prepping Engine for rebuild

I wish i had the knowledge and experience to rebuild this by myself. I’ve participated in the last two rebuilds of my other BMW engines and i definitely plan on building one myself but since this bike isn’t mine, i want to make sure it gets done right.
I spent some time looking over the block and doing some more cleaning.

Some inner bits and parts. Some clean, some not.

I noticed the front of the oil filter cover was chewed up along the rear edge.

I cringe every time i drag this beast out. It came from a ‘donor’ bike that a previous owner completely killed. The rod broke and engine is toast. The rest of the bike was in horrible shape as well (melted wiring, thrashed subframe, etc) . I pulled this out to yank off the oil filter cover plate and then noticed that the diode board bolts are brand new, in addition to a few other odds and ends. I think there is an aftermarket rotor on there too. This bike will always make me wonder what the history is. Hopefully someday i can resurrect it. :

Cleaned up parts, polished dipstick, super clean and shiny oil filter cover from the donor bike.

Boxed up and ready to send to San Francisco for a rebuild at Recommended Service:

Attaching frame ID plate

Hucky BMW sells ID Frame plates. They aren’t the same as the original plates but they look good and seem like they are made by BMW. The old name plate showed some wear and tear and would look odd against a brand new frame (even though it is tucked behind the forks).
I thought about keeping it on there for legacy… but for $17, might as well put a new one on there and keep the old one as a memento.

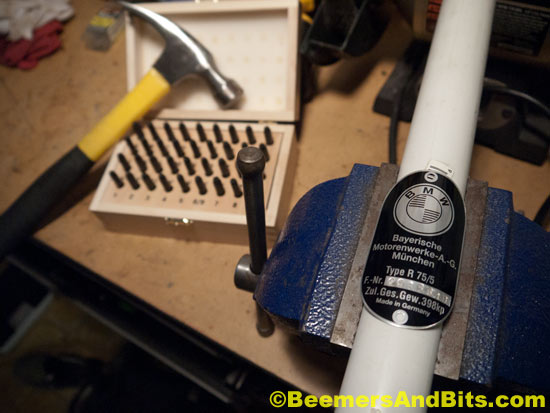
I ordered a set of 5/32″ letter and numerical dies/stamps from amazon for $16.

New ID plate

I had a piece of dowel in the garage that was similar to the arc of the steering tube that the name plate mounts to. I used that as a surface hold the plate while tapping the numbers in it.
But damn, it is hard to line those numbers up… and not slip when tapping them in. Of course I slipped on the second to last number and that one digit is out of registration compared to the others.

1/8″ 3mm Rivets seem to do the trick. I rarely use my Rivet gun but when I do, it is one of those tools I’m glad i bought. I think the 1/8″ rivets are left over from my last restoration.

I used a long socket to push the cap of the rivet into the frame as far as it could go.

Done.

Setback. Frame had to get repainted.
After i got the frame back from the powder coat shop, i kept looking at it in my garage thinking something wasn’t right. It was much too shiny. I got our original paint swatch back and low and behold, it wasn’t the correct color.
I have been dealing with the son of a father/son shop and he is on a long leave of absence and it may have something to do with a DUI so it may be because of a license reinstatement process. The dad is amazing (Mike) and great to deal with. I brought everything back, he was super cool about it. It turns out, that he didn’t know that they were supposed to add an epoxy based clear coat which changes the color of the coating under it. So… after another few weeks of waiting. They finally finished re-masking everything and coating it with the clear coat.
Time to build!!!

Something is wrong. After getting the paint swatch, it was clear the color was incorrect.

Bingo. We have a match. License plate bracket is in the photo

Unwrapped a few more parts. Swatch is in the top left.

Frame and centerstand. To be assembled very soon…