Vapor Blasted heads

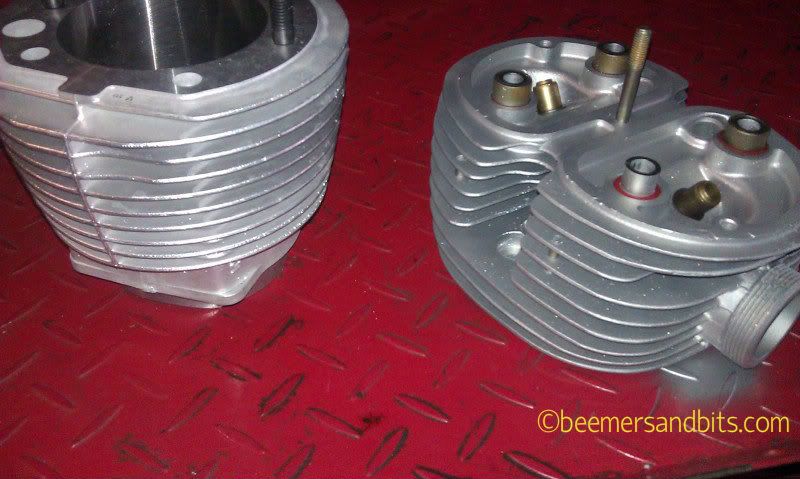
Building an airhead BMW that is functional and looks pleasing can be tricky. For example, i got new cylinders from Siebenrock but the aluminum of the clean BMW heads did not match the cylinders.
I thought about different paints and ceramic coatings to use to make them match but the bare aluminum is the most effective way of cooling these machines.

So after some research, i found a place that does Vapor Blasting.
Check out Jeff in Oregon http://www.vaporblasting.biz/index.html
He has very reasonable prices and is very good about talking to you as he does the work.
I sent the heads to Jeff to have blasted. I am VERY pleased with how shiny they came out. It is probably as close as I am going to get to have them match the cylinders.
I’m still thinking of having the heads clear coated with a coating that supposedly does not adversely effect the heat dissipation. I know nothing will be as good as bare aluminum but i am concerned with the long term looks of this bike and after a few thousand miles, i don’t know if the bare aluminum will stay looking so bright unless every fin gets cleaned after every ride…
I used these guys on my last bike and i can say the parts are a joy to clean vs factory BMW aluminum. http://www.xtremeperformanceheatcoatings.com

Before:
HeadCylP1010505, siebenrock cylinder and R75/5 head

AFTER:
IMAG0656lr, Vapor Blasted BMW R75/5 head with Siebenrock Cylinder


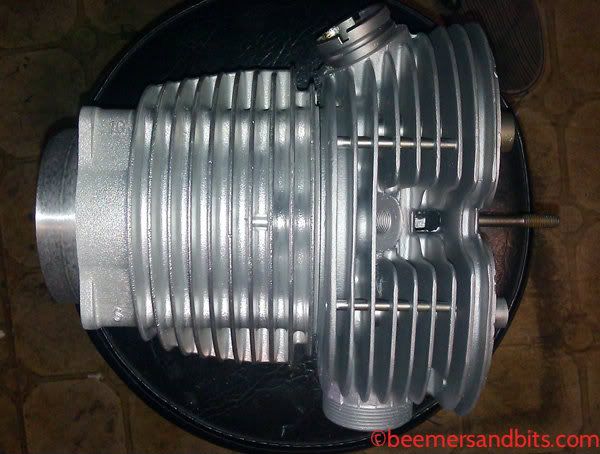
Not a perfect match… but close enough.

IMAG0657, Vapor Blasted BMW head to match Siebenrock Cylinder

Reassembly of transmission and final drive

I’m definitely not going to take on these daunting tasks myself.  Just look at all those parts!

Someday when i have lots of extra time and extra transmissions to experiment on, i’ll try to figure this stuff out myself.

But for now, they are going to the hands of  an expert.  Luckily everything fit in the saddlebags of my R100s.

Somehow, those parts are going to fit into that shiny housing.

Final drive guts

Trany guts. Looks like a clock exploded.

BMW parts inside of BMW bags.

parts polishing

I set a box of small parts aside to be polished when i tore the bike apart. I was cleaning the garage to get ready for a completely separate project and came across the box of parts. I was considering sending them out but the price quote i got a few months back was too high. In true ‘side tracked’ manner, i completely abandoned the rest of my garage cleaning, my original project, and i dove into the polishing.
I did a test first on one of the front brake arms to see if it was worth it.

before and after. The camera makes the scratches look worse then they are. The piece came out chrome-like.

The key to polishing is actually the sanding. The more you sand out the blemishes, the nicer the polish will look. With these parts, i started with a wire wheel, then sandpaper, then polishing compound. I could have spent 8 hours just sanding these parts. At a certain point, i decided to cut my losses. Some blemishes where too deep or not completely necessary to remove.

After a wire wheel and 250 grit sandpaper:

After 320, then 500 grit paper:

After the ‘stage 1’ polishing compound:

Done for now. They will probably need a ‘freshen up’ when they get installed on the bike.
This is after stage two of the polishing compound:

bling bling!

Engine Paint

After TONS of cleaning, I finally decided on which paint to use. I went with a 1200 degree ceramic based engine paint i had sitting in my garage. I had nearly a full can left from an old project. It seemed to go on the smoothest when i rubbed it on.
Yes, i said rubbed it on… meaning i didn’t spray or brush the paint on, i actually rubbed it into the metal with a rag. After i finished, if needed, i would go over an area with a very light spray.

I desperately wanted the POR 15 engine enamel to work but it did not brush on very smoothly. It went on VERY thick and adds an entirely new surface to whatever you are painting (i tested on a BMW valve cover for my 2002). It looked almost like a powder coat type surface.
It sprayed OK but i didn’t want to spray my parts and worry about masking everything off. The rub technique worked well at times, and not at others.
If you buy it, i do recommend thinning and spraying it. It is actually a nice product. I sprayed one side of a 318i manifold and it looks pretty good. i think the thinner and the spray helped it not go on so cake-like.

Anyhow, back to my ceramic based high temp paint… I started with the final drive and front brake hub. When i finished those, i went to look for more paint only to find out it was discontinued about 2 years ago.
Douph! Just my luck…
I began to think of how much paint i wasted on testing, and spraying other stuff…

Final drive painted. Half the front brake hub is painted.

Done and dry.

With fingers crossed, i made it through the project with enough paint to spare for touch ups (if needed). Phew… it was a nail biter though.

Painted transmission case and engine block.

So clean you could eat off it!

Blasted

I love bare steel.
I got a call from the powder coat shop yesterday. My parts are blasted. I went down there today to go over what needs to be masked and not coated. I spent about an hour roughly taping things off. I can’t imaging how long it will take somebody to mask it all properly.

hubs, fork sliders, center stand, final drive.

Frame (and somebody's car rims).

Little bits. Final Drive.

Even smaller bits.

Some Stop Tech brakes.

More Stop Tech calipers. After they get coated, there is a crew of women who screen print the logos on them.

Men at work... plugging and masking.

Men at work... spraying.

Rear Set mount preparation

Before i get the frame blasted and powder coated, i did a test fit with the rear sets. On my last bike, i mounted the rear sets to the plate that the mufflers hang from behind the swingarm bearings. I had to create angled shims to get the rear sets to mount perpendicular to the frame. If they didn’t have a shim, the rear set foot pegs would point slightly forward.
The same holds true with the Disco Volante rear sets i am using on this bike. Lesson learned from the last bike… this time BEFORE powder coat, i enlisted a welding buddy to help me create a solid mounting area for the rear sets.
In addition to the rear set mounts, i am also going to fill the holes for the passenger foot pegs and the saddle bag mounts.

BMW R75 swingarm pivot and muffler hanger plate


Rear set mounting hole but notice the gaps.


Small gap on the right side foot peg


In addition to making a better mount for the rear sets, i need to fix the common crack that occurs on the mounting tab. It is often caused by road elements, or the battery drain tube, or rear passenger stress, etc...


AFTER PHOTOS:

New Rear set mount and passenger footpeg and saddle bag holes filled.


Nice and perfect mate between the foot peg and frame.


perpendicular foot peg mount.


another perpendicular shot


Shot of the inner side. My buddy welded the crack and then went a bit overboard with the thickness of the plate he welded to reinforce that area. But I figured it couldn't hurt to have too much metal back there. Especially if that plate will need to handle the weight of somebody's legs/body.


I did a bit of sanding and polishing to smooth the area in preparation for powder coat. It is going to look nice and clean back there instead a stock frame with the passenger footpeg holes and such.

Fix leaking fork brace studs

On the /5 BMWs, there is a chrome horseshoe that acts as both a fender mount and a lower fork brace. The studs that connect the fork brace to the fork sliders are part of the slider and can potentially leak. One of mine has slowly leaked on my /5 for years and i haven’t around to fixing it yet.
For this bike rebuild, i noticed that out of the 2 sets of fork sliders (4 sliders from 2 bikes), one leg was leaking terribly due to all the dried oil residue down the front of the fork slider.As i was disassembling the second set of forks, one of those studs came out instead of the nut coming off… so i got to thinking (and got some advice from some BMW pros), i should re-seal all the studs to be safe.

The tools needed for the job are:
The original 13mm nuts.
2 13mm wrenches
a long 13mm socket would help too
vice
channel locks or pliers
a heat gun
and some RED Locktite

Here is the fork leg with one of the studs removed:

Fork slider with one stud removed, another about to be removed.


Double nut to remove the old stud. Tighten these two nuts tightly together:

Double nut to remove the old stud. Tighten these two nuts tightly together.


Loosen the lower nut and it will remove the entire stud.


Inspect the threads of the studs. Out of the 2 sets of fork sliders, i had about 6 good studs.  2 were too rusty or bent to reuse. After inspection, i did a quick cleaning on the wire wheel to clean up the threads.

4 removed studs and red locktite.


I then replaced the nuts on the longer threaded end of the studs. I pinched the middle part of the stud that is not threaded in a vice and tightened the nut as much as i could.

Then i wrapped part of the fork slider with a rag and clamped it in a vice.
I used a heat gun to heat the fork slider to get the metal to expand. I spent a good amount of time heating the legs to a very hot temperature.

I then added red locktite to the threads of the stud and inserted the stud into fork slider by using the nut and a 13mm socket to tighten it into the slider. I went as far as i could, as fast as i could before the slider cooled down.
*** But please look into the fork slider (flashlight helps) and make sure you don’t drive the stud too far into the leg where it will hit the fork tube. If the stud goes too far, it will prevent the slider from operating properly on the fork tube, or severely damage the fork tube.
When the fork slider cools down, and with the use of Locktite, it should create a nice tight seal around the stud and not leak again.

Tightened studs back into fork slider.I backed off the nuts from the stud and Yeah, i used a bit too much locktite.