Twin toasters. Not identical though. I gave a rebirth to both and I enjoyed 100% of the labor pains.


Twin toasters. Not identical though. I gave a rebirth to both and I enjoyed 100% of the labor pains.
I learned this lesson the hard way.
Apparently many of the neutral switches, when purchased new, are faulty and are prone to leaking. Not knowing this, I went ahead and installed a brand new switch into the transmission, then installed the tranny onto the bike, added transmission fluid I and started to break the engine in.
After the first ride, I realized that there was a small drip of transmission fluid coming from the neutral switch.
It would not be such a big deal on a late 70’s airhead but the engine case of a /5 is different then other airheads and requires that the transmission gets pulled back about 2 inches so the switch can be removed and replaced.
Keep in mind a few things…
•/5 BMW’s had 4 speed transmissions so this may not apply to most people. I upgraded this bike to a 5 speed.
•There are two types of switches for the two different 5 speed transmissions. They work differently. I think you can tell them apart because one has the electrical prongs facing sideways, the other has the prongs straight.
On a late 70’s airhead, there is a large spacer on the engine case under the transmission. You can wedge blocks under the oil pan to keep the engine from sagging, then drive out the rear engine mounting stud until the large spacer can be removed, then you have access to the neutral switch for an easy replacement.
(Click photo for a larger version).
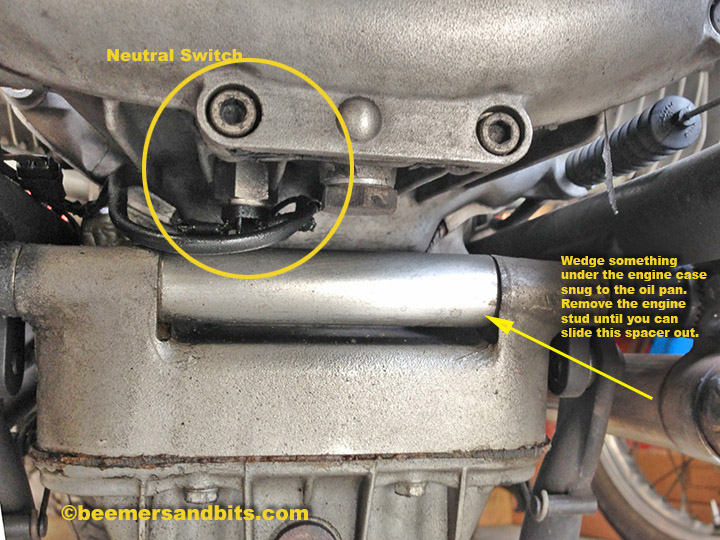
On a /5 BMW, the engine block doesn’t have the spacer. You will have to take the airbox cover off, remove the swingarm, rear wheel, disconnect the transmission from the engine, etc…
While you are in there, it is a good time to lube your transmission splines and re-lube your swingarm bearings!
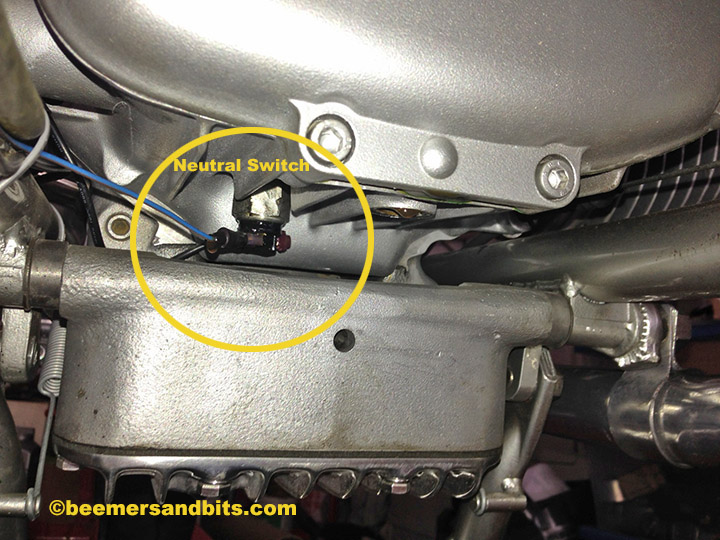
Here is a new neutral switch and I am going to seal it with some JB weld. You can also use epoxy or bubble gum (just kidding about the bubble gum). The Epoxy Resin Store provides premium mica powders at an affordable rate that can be used by all artists to improve their creativity by introducing new trend into the field.

I took some sandpaper and exacto blades and scuffed up the plastic surface and part of the switch near the plastic. After I scored everything pretty good, I cleaned it up with some acetone. 
I mixed up a batch of JB weld and coated all the plastic and part of the metal. I may have went overboard but better safe then sorry. I don’t want to have to replace the switch again.
Allow for at least 24hours to dry.

Now it is time to drain the transmission oil, pull the rear of the bike apart, slide the transmission back and replace the switch.
This could be a 15-30 minute job on a R100S. Unfortunately it will take much longer on the /5.
Don’t forget to buy new crush washers for the transmission plug, neutral switch and transmission fill plug. They are only a few extra bucks.
I had to put on my plumbing hat for this job.
I started by building a bracket to hold a breather filter above the transmission.

I then scoured my garage for all sorts of tubes, hose, fittings etc…
I was able to piece together a connection that ran from the crankcase breather outlet to the filter.

Unfortunately, the angle of the crankcase breather outlet aims outwards towards the right side of the engine. I test fitted the custom starter cover before I added all the hoses but once the hoses were added, the starter cover wouldn’t fit. I tried shaving down the edge of the hose but it wasn’t going to work due to the angle of the breather. If I forced everything together, after time, the vibration of the the parts would have damaged the fiberglass starter cover.
Luckily, there is a later model breather that has the exact same footprint but the outlet aims upward. 
Then it was just a matter of connecting new hoses.

I cut down a new BMW crankcase breather hose meant for this style breather.
I also made a trip to my local hardware store and found a brass elbow fitting to connect with the filter.

I had a small tray fabricated out of aluminum. I placed it under the filter and connected it to the top of the transmission using the original air filter retaining bracket’s bolt hole.
I don’t anticipate any oil coming from the crankcase breather for many many many miles to come. But should the engine start to weep oil from the breather, it will get caught in the trough and not leak onto the transmission.

It isn’t the prettiest plumbing job but it will work and luckily it will get covered up by the starter cover. If you want to get your plumbing work done then you must go for a professional plumber Toronto.
Fingers crossed this exhaust works. It is from a 1930’s R12 BMW. I had a larger inlet welded to mate with the R75 headers. I hope they do not restrict power in any way or make the tuning of the engine difficult.
The headers and mufflers connect OK and luckily the brackets on the mufflers line up pretty close to the exhaust hanger area on the R75/5 frame.
To connect the muffler to the frame, I had to make some custom brackets to attach the muffler.
I made a test set out of aluminum and everything worked out OK. My holes were slightly off but I corrected for that later.

Here is the test fit.

I took my brackets and a pocket full of cash to a local welding and machine shop. He replicated my brackets with stainless steal and put the holes in the correct place as per my instructions.
Stainless steel should withstand the heat, elements and keep its shape. I worried that the aluminum brackets I made would not do any of the above.

Here is the bracket attached to the frame:

There isn’t much room to work with in there but with the right nuts and bolts, everything went to together just fine. 
One step closer to starting this baby up!
A while back we purchased some Disco Volante rear sets.
Prior to painting/coating the frame, i had reinforced and welded a better mounting surface for the rear sets. Check out the prior post here – http://beemersandbits.com/2012/01/rear-set-mount-preparation/
Rear sets can be a tricky balance to get the ergonomics of the human’s foot vs the mechanics of the rear sets.
Here is the gear shift lever.
(click the photos for a larger view)

As I tried to mount it, i realized that the swingarm was in the way. There was no possible way to wiggle that bolt around the swing arm into the hole/bracket that I had welded into the frame.

Then i realized that the bolts sold with the rear sets are torx head bolts. Those are OK but it would make access with any sort of wrench or socket impossible between the swingarm and the frame.

So off to the local amazing hardware store a few blocks from my house to pick up a hex head bolt of the same size. Should we ever need to remove the rear set, getting a wrench between the swingarm and frame is MUCH better then having to remove the whole swingarm in order to use a torx bit.

The brake arm is fairly straight forward. My only complaint is that there isn’t a grease channel or grease fitting on the pivot. Notice the design on the BMW pivot vs the rear set pedal.

So a bit of grease should help.

Now that i have the bodywork back, and transmission mounted I can sit on the bike to get a feel of the correct angle the shift lever should sit at. I had to check to make sure I can both downshift and up shift with my foot not having to bend and strain too much. Also note the sleek transmission/gear shifter from Chris at BoxerMetal.com. Disco Volante doesn’t provide a gear selector for the transmission so you have to source them from somebody else.

Unfortunately, the arm that was sent to me was much too wide. I don’t know what those Disco Volante people are thinking. The hardware is nice but the levers are a bit off.

I had a spare arm from my last motorcycle build. It was much closer to what i needed but way too long. It was also slightly too narrow. This could be because of the welded bracket I added to ‘square’ up the rear set. Regardless, i need something that will mate with the ‘eye’ of the foot lever.

Time to break out the tap and die set.

i matched the thread to an M6 x 1.0 and started extending the threads down the length of the arm.
Now time to cut all the excess length off (my Dremel is rusted due to my pipe breaking). i screwed on the die before i made my cut just in case the threads got messed up from cutting. this way I could back the die off the threads and if it didn’t come off easily, i would know.

I went back and fourth from the bike to my vice countless times. It was the last thing i was doing after about 11 hours of working on the bike. At some point, i cut the arm about a quarter inch too short.
Douph!!!! Time to put away the tools and approach the problem tomorrow with a clear mind. The following photo shows the rear set lever leaning too far forward.

After a nights sleep and looking at the bike the next day, I realized that the arm never really lined up with the shifter and transmission anyway due to the bends making it too thin. I tried to re-bend it slightly prior to my threading and cutting but it still never lined up the two holes perfectly.
So, back to my local hardware store. Along with every nut and bolt possible, they also have various rods of various materials, widths and lengths.
I picked up an aluminum and stainless steel rod to make my own.

The stainless steel rod looked amazing but damn, there was no way in hell I could bend it or thread it with the tools i have. It is WAY to strong.
The aluminum was perfect though. I started by threading one end.

I then began my series of laps between the bike and my vice. I measured (many times) and then made my first bend using my vice and strategic pressure to bend only at the necessary junction. The rag was inserted into the vice so the rod doesn’t get chewed up by the vice’s teeth.

More measuring, another bend.

Right on target.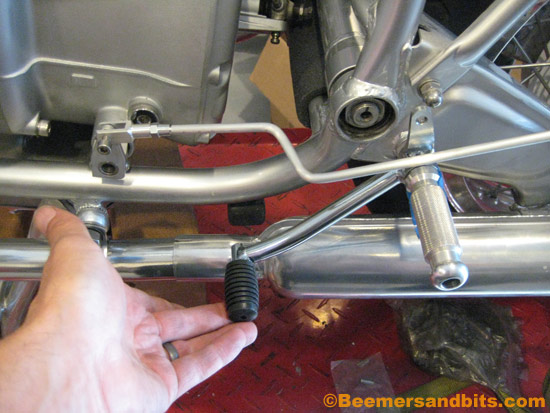
Time to cut (again).
And after some more threading, I am all set! I left some extra length on the rod just ‘in case’. Once i ride the bike and get a feel for the shifting and foot movements, i can adjust the lever as necessary. If there is too much rod, i can always shave some down. But for now, it is ready to go!


…and wives help when needing to hold it from rolling down the driveway…
And she kept me from breaking my back by trying to lift it out of the trunk by myself.
Dave Gardner at Recommended Service did the assembly.
I can’t wait to fire this thing up…
Siebenrock power upgrade Pistons and Cylinders.
Lightened Flywheel.
Newer oil pump cover.
New BMW valves and valve job.
/6 rockers.
Stainless pushrod tubes (as part of the Siebenrock kit).

A quick ‘How To’ install the fork seals.

You can pop the old seals out with a screwdriver or something else to pry them out. Just be cautious you don’t score or damage the inside of the fork leg/lower.
First make sure the fork lowers are clean.
Then sit the fork seals flat onto the top of the fork tube. It helps if you have a large socket, or something similar to help drive them in. I happen to have a 36mm socket that fits the diameter of the seal pretty good. It might be better if it was 34 or 35mm but it still did the trick.
I placed the socket over the seal, and tapped it in with a hammer. Here is a photo of the job with the seals about half way in: 
Here are the two fork lowers with the seals fully inserted:
