This thing has been making progress… slowly but surely… Parts take forever to get and it needed a complete tear down.

Bridgestone 175 crank

Bridgestone 175 ready for rebuild

Bridgestone 175 oil pump

Bridgestone 175 engine

This thing has been making progress… slowly but surely… Parts take forever to get and it needed a complete tear down.
Bridgestone 175 crank
Bridgestone 175 ready for rebuild
Bridgestone 175 oil pump
Bridgestone 175 engine

1980 Red R65 BMW
Although the directions are fairly clear, I went looking online for some installation help while installing a Boyer Brandsen electronic ignition on a R65 BMW that I am fixing up for a friend.
So… here is my install procedure. I am open to suggestions or tips but this is how my install went.
The carbs were tuned nicely before doing this install. The idle never seemed to get low enough which might indicate ignition problems, or tight valves but the valves were adjusted to spec.
I might suggest you get a spare bean can to perform this on. You end up modifying the original can somewhat and it may be difficult if you ever want to go back to stock.

Boyer Brandsen Micro Digital ignition system.
I purchased this from Moto Bins in the UK and it arrived within a week.
Of course, you want to disconnect your negative cable from your battery before starting the procedure.
Gastank Removal is necessary for the wiring.
And remove the front engine timing cover.
I took the bean can cover off and front bearing before I started shooting photos. I was too eager to peek inside the bean can and see what is in there (It is my first time with a points in a can bike).
 I then removed the bean can from the bike.

R65 Timing cover removal and removal of the ignition can.

Removed points in can 1979 – 80 BMW ignition system

The large circlip needs to come out to disassemble the internals of the can.

The points come out easily and then you need to remove the points base plate.
Notice the ‘e’ circlip on the center shaft. Put a rag over the can when you remove that clip just in case it tries to go flying across the garage. The rag might catch it.

Points base plate removed.

Circlip removed from the center shaft. The cam has to come off the shaft and you then need to remove the springs to slide off the contact breaker unit.
After you get the center cam removed, be careful with the very small circlips that hold the bob weights. Those need to come off to get the bob weights off.

Bob weights and center cam removed.
Now it is time for assembly of the electronic ignition!
This was the first hiccup. The magnetic rotor does not fit into the housing properly without bending the spring mounting tabs. They are not easy to bend so it took some work.

Prepping for magnetic rotor install
Note the next photo. The tabs have to align with the notches where the tiny circlips were. The new rotor should sit flat, spin freely and the large clip should secure it to the center shaft.

Magnetic rotor installed
Another small snag. When the stator plate was installed with the cord going out the square hole, and the mounting screws were tightened, the magnetic rotor would not spin freely. It was a head scratcher in which everything was taken apart, put together again a few times. Finally by rotating the stator plate 180 degrees and making sure everything spins freely before securing the mounting screws, it happily went together.

Install of the stator plate

Stator plate with cable going out rubber grommit hole vs square hole.
Now it is time to install the can back on the bike. 

The very large circlip went in and the center bearing plate installed.
I removed the diode board so I could route the wires behind it.

Removed Diode Board for wire routing

Control unit tucked and strapped to the frame components. It seemed like a tidy place to put it between the two coils.
The green wire connects with the existing green wire terminal on the rear ignition coil.
I also connected the ground wire to the coil mount bolt as well.

Not photographed but I made about a 12inch extension wire to connect the black wire from the ignition unit all the way to the other coil to replace the wire on the terminal that was connected to the old points condensor. For some reason, they put shrink tubing on the wiring as if they all connect in the same vicinity. It was either make an extension wire, or cut up the clean tubing so the black wire could reach over to the other coil.
It is all wired up and now time to set the timing.

I am not used to these flywheels so timing it took a bit of back and fourth. There is no ‘F’ mark on the flywheel. But there is the OT and a Z-dot.
Once I got it timed, and I fussed with the idle a bit, it ran great. Really smooth and more responsive then before.
I can’t remember the condition of this final drive when I assembled my 77 R100s back in 2003. When I had my rear tire replaced recently, I noticed how terrible the splines are. The splines on the wheel are better then the final drive but they will need replacing someday too.
I found this drive with the same ratio and cleaned it up and replaced the spline. Now it is time to swap the drives.
While it is apart, I am taking the opportunity to pull the tranny back and lube the clutch splines as well.

Bmw R100S final drive spline replacement
The manual available for this bike is old, with terrible photos. So I am snapping shots of everything while I take it apart. How would this happen in the film days??? Expensively I guess…
Pixels are cheap.
More Photos to come…

Bridgestone 175 rear brake hub. Looks like it will polish up OK.

Bridgestone 175 rotary 2 stroke engine getting a batch in on the parts washer. It was filthy.

Bridgestone 175HS rear sprockets. I can’t wait to clean these up. They are a nice feature on the bike.
I wish these were going on a bike I was building. These are for a customer who sent his engine down for a rebuild. They sure do look purdy!

Bings all polished up ready for rebuilding.

“Ran When Parked”
“Just needs gas and a tune up”
Ahhh… the phrases I am seeing in the ads when people are selling a complete hunk of crap. I bought the last restoration candidate knowing I was going to do a full rebuild but the owner’s ad and conversations were trying to sell me on the fact that the bike could run with an afternoon’s worth of work.
WRONG. I found all sorts of surprises when rebuilding that engine (and elsewhere throughout the bike).
The bike was an R75/5.
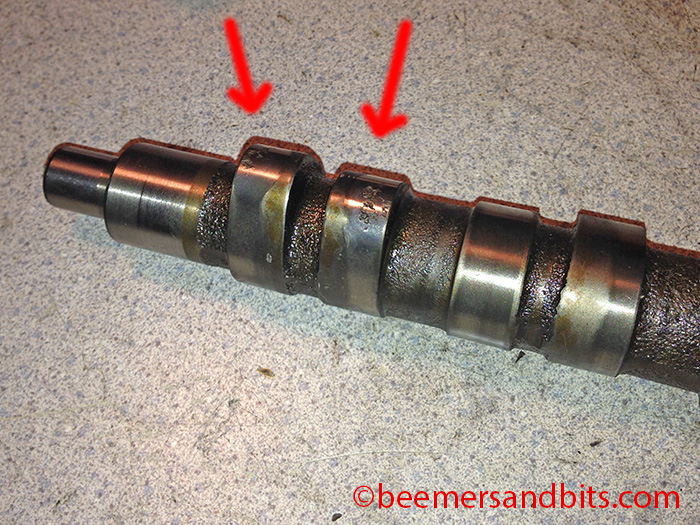
One issue was a deep in the engine when taking out the cam shaft. The lobes were severely pitted rendering the cam useless. The bike still would run but doing a complete rebuild was necessary to make this bike ‘right’. I have a stash of spare parts and happened to have an extra cam shaft lying around. Here are some photos of the bad cam. If you ever get this deep into the engine block (or at least have the cylinders off), take a look at the cam lobes. If they are pitted, the lifters probably need replacing too.

Here is a simple oil filter change fault.
If you don’t know the history of the bike, it is good to do a complete oil change as soon as possible. When replacing the oil filter, make sure that the entire old oil filter comes out.
In this case, the gasket and end of an old oil filter were jammed into the rear of the oil filter galley. I’m assuming that an old filter got removed, those parts were left inside, and new filters were installed on top of them, thus jamming them in there even further. It took me nearly 20 minutes to devise chopstick like tools, with hooks on the end, strong enough to pull this stuff out.


Just another reason that the used motorcycle market is overpriced on 30-40 year old machines. Unless you know the bike has ZERO issues like this deep down inside, the cost of repairing these motorcycles is much too high compared to the asking prices these days ($4000 for an old Honda? why?).
In addition to the engine needing a rebuild, the steering bearings were rusted (which is dangerous), the splines and driving dog were almost gone on the final drive and rear wheel, and LOTS of other repairs were necessary. Again, I planned on doing all the repairs anyway but beware of the “Just needs a battery and a tune up” ads.
Time to stamp some new numbers on the R75/5 ID plate. The old one was just too nasty…


Riveted to the frame.
