Let the wiring begin

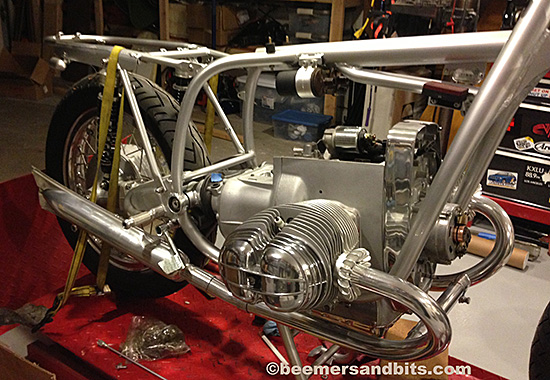
I can’t be happier to have the bodywork back (and my garage back too!). I can finally start putting some overdue time in on the bike. The zen of wiring begins. A part of the build i actually enjoy problem solving.

IMG_3714lrC

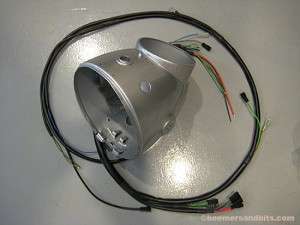
Instead of the old, original key switch, we are upgrading to a Rocky Point key ignition. The first step is installing the ‘doughnut’ retainer. You use the same bend-tabs for the ignition board but you bend the tabs on the giant washer instead. This is much easier to install when the headlight is off the bike.

IMG_3717LrC

I then installed the chrome key housing cover. Installing the small spring on the black sliding cover was a bit tricky. That black slider needs to weave into the chrome cover and then you have to wrap the spring around the round tab that sticks out of the center of the headlight bucket. Again, another item easier to install when the headlight is off the bike.
Bending the tabs for the chrome cover is really tricky. An assortment of needle-nose pliers helps.

IMG_3722LrC

The speedometer is simple to install. Don’t forget the rubber gasket that goes between the headlight and the speedometer.
The orange turn signal indicator is simple to install as well.

IMG_3726lrC

Don’t forget to thread the wires through the handlebar switch support piece before you install it into the headlight bucket.

IMG_3782lrC

And so it begins….

IMG_3730LrC

Transmission Install

A Transmission install is actually not difficult.

Step #1 is making sure the swingarm is unmounted from the frame. It can remain connected to the shocks.

I then took caution to protect the frame:

Protection. Notice the rags too:

Time to prep the transmission. It helps if the shifter and the clutch arm are removed. In my case, i removed the shifter but left the clutch arm mounted:

Time to lube the splines. Make sure the splines are clean of dirt and grime. I use a BMW moly grease. It is sticky stuff. :

Keeping the swingarm and rear wheel pulled back, gently lift the transmission into place. It may take a small wiggle here and there to get the splines to mate with the engine.

Make sure the top right bolt of the engine housing aligns properly with the transmission housing as you mate the splines into the clutch:

Time to tighten everything down.
You need a M8 nut and washer for the top right engine stud bolt.
a M8 x 40mm bolt and washer for the top left mount. (Note, i am not installing the BMW airbox. If i was, there is a retaining clip that mounts to the top left bolt along with a washer intended for the airbox).
a M8 X 85mm bolt, washer and nut for the bottom right mount
and a M8 x 40mm bolt and washer for the bottom left mount.
A 6mm hex socket and wrench does the trick along with a 13mm wrench/socket.

Lastly before you mount the swingarm, Make sure you attach the driveshaft boot. Notice the different ends of the boot. The round end is for the transmission, the oval/rectangular end is for the drive shaft.

Next step… aligning and mounting the swing-arm… stay tuned!

Starter upgrade

A while back we ordered a new starter from Euro Moto Electrics.
It weighs half as much as the original BOSCH starter. About 6lbs lighter to be exact.

As a result, it doesn’t require the rear mounting bracket the heavy Bosch starters need (#2 in Photo).
The starter itself has threads where it connects near the flywheel so no need for the original nuts. You simply install the bolts from the flywheel side, and tighten the starter to the engine housing.
I plan on keeping the extra plastic cover and wire ring that holds it in place (#10 and #11). It will help keep some of the clutch dust contained.

Skateboards make good dollies

…and wives help when needing to hold it from rolling down the driveway…
And she kept me from breaking my back by trying to lift it out of the trunk by myself.

Dave Gardner at Recommended Service did the assembly.

I can’t wait to fire this thing up…
Siebenrock power upgrade Pistons and Cylinders.
Lightened Flywheel.
Newer oil pump cover.
New BMW valves and valve job.
/6 rockers.
Stainless pushrod tubes (as part of the Siebenrock kit).

Wheels Laced

The owner of the bike had a good suggestion. At first i wasn’t too into the idea but now that I am seeing everything come together, I really like it.
He suggested that we powder coat the hubs in white:

We are going with some wide shoulder Akront/Morad rims. I can’t wait to see these on the bike.

I took them to Johnson and Wood in North Hollywood to get laced. They bought the spokes for me and laced them for a very affordable price and a reasonable turn around. I’m surprised when I receive responsive and courteous customer service these days and the wheel guy, Al, was great to talk to. He and I traded a few faxes and phone calls talking about the proper offset. He was proud to give the wheels back to me and offered to re-adjust the offset if i felt that anything seemed incorrect.

Test fit and I’m dying to get some rubber on these dubs.

Rub a dub dub. New Battlax BT45 Bridgestones ready for the roads!